

Bubl welcomes you to the world of spherical technology!
Setup the Bublcam
Please take the following steps to setup the Bublcam:
- Fully charge the Bublcam with the USB cable and power adapter provided to you for ~2.5 hours. The bubl button will flash blue while charging and turn off when fully charged.
IMPORTANT: We strongly recommend that you charge the Bublcam with the USB cable and power adapter provided to you. We cannot guarantee full charging speed and efficiency if you use other micro USB cables and adapters or attempt to charge the Bublcam via a computer USB port. -
Insert a microSD card, label face down (exposed chip face up), until it clicks into place. To remove the microSD card, lightly push the card edge inwards with your fingernail. It will spring loose from the slot and you can remove it.
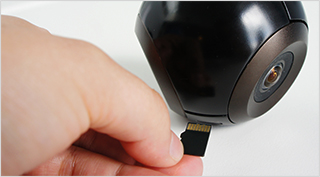
NOTE: You will be unable to capture content if you turn the Bublcam on before inserting the microSD card. Also, you will lose media if you eject the card while capturing.
Recommended memory card requirements:
- microSD or microSDHC
- at least Class 10 UHS-1
- FAT32 formatted - FAT16 formatted will not work
- maximum 32GB - Important: the Bublcam does not support memory cards greater than 32GB, eg. 64GB cards will not work.
- Power on by pressing and holding the bubl button until the LED begins pulsing blue. The bubl button will turn green when it is ready to capture in photo mode. To power off, press and hold the bubl button until the LED turns off.
-
Download the “Bubl Xplor App” mobile app for iOS or Android. The minimum system requirements are: iOS 8+, Android 4.1+.
 OR
OR 
Getting to know the Bublcam
Terms you need to know:
bubl - a spherical photo or video
Bubl Cloud - www.bubl.io - where you store and manage your bubls
What’s in the box?
- Bublcam
- USB cable
- Wall adapter
- Mini tripod
- Cloth pouch
- Lenspen
Bublcam diagrams:

LED Colour Chart
The Bublcam uses LED colours to communicate with you. Here’s what it’s telling you:
|
LED Colour |
Behaviour |
Description |
|
|
Pulsing |
Powering on |
|
|
1 flash every 4 seconds |
Charging. Battery is under 50% |
|
|
2 flashes every 4 seconds |
Charging. Battery is between 50-74% |
|
|
3 flashes every 4 seconds |
Charging. Battery is between 75-99% |
 |
Pulsing |
Saving a file |
|
|
3 quick flashes |
Capture failed - check to see that the microSD card is inserted correctly or if the card is full |
|
|
Slow flash |
Preparing to capture a photo/video |
|
|
Quick flash |
Ready to capture. Capture will begin on the third quick flash |
|
|
Solid |
Capturing a bubl |
|
|
Solid |
Video mode. Ready to capture. |
|
|
Solid |
Photo mode. Ready to capture. |
|
|
Pulsing |
Recovering. Will reboot when complete. |
|
|
Flashing |
Something went wrong. Need to recover the OS. |


Connect to the Bublcam
Your Bublcam hosts an onboard WiFi network chip that allows it to communicate with external devices such as your tablet or mobile phone. Here’s how to connect to your Bublcam:
- Open the Bubl Xplor App and tap Capture

- As per the instructions listed on the screen, go to your device network settings and look for “Bublcam_” followed by a series of letters and numbers in your WiFi networks and connect to it. The default password is: 12345678.
- Return to the mobile app. You should land on the “SCANNING” screen. Once the Bublcam has been found, you will be directed to the Capture screen.
Capture photos with the Bublcam
Before you begin capturing bubls, and to ensure optimal quality, make sure to do the following:
- Mount the Bublcam on your mini tripod or any standard tripod mount
- Ensure that objects (including yourself) are at least 1 meter (3.3 feet) away from the Bublcam, unless they are positioned in the centre of a lens, before capturing
- Don’t forget that spherical media captures everything around you, if you do not want to appear in the bubl, hide from the Bublcams view and initiate media capture using the mobile app
- Ensure the orientation of the Bublcam is right side up (not sideways or upside down) and that it is positioned to ensure proper exposure/white balance when you begin capturing
- Please capture multiple photos in different environments
- Please ensure the following conditions while capturing these photos:
- Good and consistent lighting
- Plenty of features and detail in the scene
- Medium sized room/store/area - not an open field or very small room/closet!
- Bublcam should be mounted close to eye level while standing
- Avoid: objects/people within 1 meter (3.3 feet) of the Bublcam, white/blank walls, movement of Bublcam or objects around it.
- See Best Practices for using the Bublcam for more info.
-
Select Capture
 and you will be taken to the Bublcam’s Capture screen, which allows you to visualize your bubl in a real-time preview.
Press the Capture button to begin capturing a photo. The bubl button will begin with a slow red flash, then a quick red flash (~10 seconds). After the third quick red flash, the button will become solid red meaning the photo is being captured. Next, the bubl button will pulse yellow, meaning the file is saving.- Proceed to capture multiple photos in different environments to help enhance the quality of your bubls over time.
View & upload your photos to the Bubl Cloud
Bubl provides you with a cloud storage service (Bubl Cloud - www.bubl.io) where you can upload your bubls to manage, view and share on both web and mobile. The following steps will take you through the process of uploading your bubls:
Once you have captured your bubl, a small thumbnail will appear in the bottom left corner of the capture screen in the mobile app. Select this thumbnail. You can also navigate to a photo through My Media if you’ve already taken photos that you would like to upload.
If you use 3G, 4G, LTE to connect to the internet:
- While viewing your media, select More
 in the top right of the screen, then tap Upload to Bubl Cloud. NOTE: You must be connected to the internet for upload to work.
- While viewing media, select More and tap Save to my Bubl App. Navigate back to your device Wi-Fi network settings and connect to your internet WiFi hotspot. Return to the mobile app, view the file that you want to upload, select More , then tap Upload to Bubl Cloud.
- While viewing your media, select More
- You will now be prompted to create a Bubl account. Please register by filling out the displayed fields and selecting Create Account.
- Customize your title and description and select Save.
Congratulations! You just captured and uploaded your first bubl! Please note that it is important to capture and upload multiple photos in different environments to optimize the quality of your bubls over time. Please consider the following:
- You may notice that the initial alignment between the 4 lenses is not ideal.
- In order to assist the Bublcam with its alignment, simply continue to capture photos in multiple environments and upload them to the Bubl Cloud.
- Please ensure the following conditions while capturing these bubls:
- Good and consistent lighting
- Plenty of features and detail
- Medium sized room/store/area - not an open field or very small room/closet!
- Bublcam should be mounted on a tripod, close to eye level while standing
- Avoid: objects/people within 1 meter (3.3 feet) of the Bublcam, white/blank walls, movement of Bublcam or objects around it.
Learn more about how to use the Bublcam and its ecosystem:
Transferring files to desktop and uploading to Bubl Cloud to view on the web
Capturing photos with the mobile app from your device (remote control)
Capturing photos with the bubl button from the Bublcam
Changing between photo and video modes
Capturing videos with the mobile app (remote control) from your device
Comments